

A couple of friends and I had tossed the idea of cosplaying as Final Fantasy classes since heading down to Glasgow for MCM Scotland last year, which was the inspiration behind this costume.
In the MMORPG Final Fantasy XIV, my main class is the Summoner, which made me want to make the costume for that class for myself.
Now, the character I play as a Summoner is female in-game, but luckily, the costume is almost identical with male characters, the only difference being the addition of leggings under the tunic. So for the most part I was able to use my character in-fame as a reference for the outfit, using the 3D in-game model to view the outfit from all angles.


[Some concept art, promotional art and screenshots of FF14’s summoner class]
The Horn
One of the things that made me choose the summoner as a cosplay was the horn. It’s so silly yet strangely awesome in it’s own way that made me want one for myself.

I started off by using my character as a reference to free-hand draw the rough shape of the horn on to paper, which I then traced on to dense insulation foam.

I then cut the horn out of the foam with a craft knife, getting the rough shape

I then used the mold-able glue Sugru to repair any mistakes and refine the shape before standing the horn down, and then covering the horn in Worbla thermo-plastic. (Not pictured)

Next up was the headpiece (not pictured) and the decorative side parts. It was a similar procedure to the horn, but instead of one chunk of insulation foam, I cut the shapes out of craft foam. Each colour on the template above was a different layer of foam. Those layers were traced, cut out and placed on top of each other to crate a 3D shape.

Those shapes were then covered in Worbla for rigidity and strength.

I realized that the horn and head piece was too large for my head, so this version you see above was the 2nd attempt at it, all painted with acrylic paint and spray paint.
 And here is the finished horn with everything attached.
The Small book
The Small book is a little detail that may be over looked, but I wanted to include it. I bought a cardboard book-form from Hobbycraft and painted it white.

I then covered the white book with faux leather and added foam shapes for the blue triangles on the book.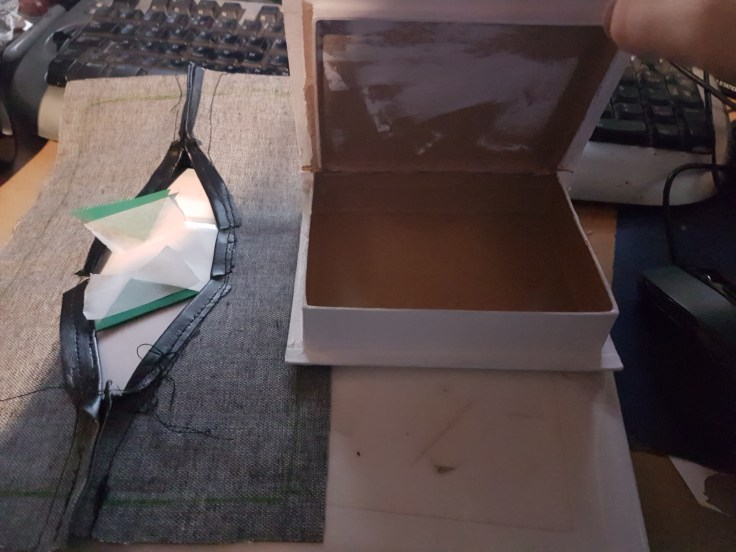
Foam Armour
The foam armour was made in a similar way to the side panels of the headdress, using different layers of foam to create a 3D shape as seen with this wing. The only difference is that I used EVA foam rather than craft foam.

The shape is then covered in faux leather and glued in to place piece by piece so the faux leather takes on the 3D shape of the armour piece.

The flat shoulder pieces were a lot easier as they did not have as many edges to worry about.
Misc decorative Armour pieces
For the more decorative pieces I did the same as the head dress, by making shapes in paper, using the game as a guide, tracing those onto foam, then layering the foam on top of each other to make a 3D shape.


The Coat
I didn’t take any images of the coat as I was making it, as it was my 1st proper attempt at sewing a coat and at the time I was focusing on trying to make it right (which didn’t work out quite as planned). It was quite a battle to get this right.
I had been watching Kamui Cosplay’s tutorials on the Summoner outfit and was trying to follow the links to the patterns for the coat she used, but the link was not working, so I resulted in taking a screenshot of the video where she showed all the panels of the coat and started working from that. However you may be thinking “how did you figure out the sizes and get them right?” well, I’ll tell you. I didn’t get them right. I got the shapes right, and parts of the coat fit me and parts did not, so there was a lot of alteration at the back of the coat to try and get things to fit, that, and the coat was far too long, meaning I had to trim off a good 7 inches of material from the bottom of the coat. Annoyingly, I made the arms too short, so, running out of time, I made arm extensions, to make up for lost length. Not the prettiest solution, but It got the job done in time.
The Tunic
As of writing this, I have not made the tunic. I plan to trace the pattern of a basic t-shirt and extend the length to where it needs to be, flaring out the bottom slightly, adding the pattern in a red fabric, before putting that on my mannequin to trace the upper portion to get the sizes for the faux leather portion.
The Grimoire
The Summoner’s weapon, the grimoire of spells. I first looked through the variety of weapons that the summoner gets in game and tried to choose one that was rather simple to make, while still looking good. I settled on the grimoire, “The Book of Spades” in game as it met these requirements.


I have no pictures at the time of writing this, but I am still working on it. What I have done so far is buy a £3 hardback book on cocktails and added cardboard to the back to get a nice even more solid back to it, I added another hollow rectangle of cardboard on top to get some of the book’s definition. On the back I epoxy-ed on a hook to hang it from my belt for quick access to the book. I cut out triangles of card for the spikes, then bound the book in faux leather, leaving space between the book and the spikes to allow the spikes to fold inside the book. I even went the extra mile and lined the inside of the covers with red felt to clean up the interior. I have added the pages from in-game to the middle page of the book, so I can open it and “wield” the book. I am still to add the design to the front, but aim to do that using a mixture of Worbla, paint and craft foam.
The Boots
For the boots, to get the shape of my leg, I covered my leg in clingfilm, wrapping it up like day-old meat until i got to the top of my leg. I then covered the clingfilm with duct tape to the same point. I drew on the shapes of the boot onto the tape and then cut myself free. I cut out the shapes from the duct tape and transferred those shapes onto faux leather.
I then sewed around the edges of the leather to neaten everything up and then I attached the black “belts” on top, before joining all the different sections together.

For the shoe section of the boots, I actually got a pair of shoes and placed faux leather on top of them, gluing it to the shoe at the opening and around the sole.
The Final Product.
As it stands at the time of writing this, here is what the costume is looking like. I just need to make attach and finish a few more things before the costume is ready for GCCC 2018.


